How to Build and Dismantle Flat-Pack in a Rented Flat
Flat-pack furniture can survive a move if you build it properly. The tools renters need, how cam locks work, and how to take it apart safely.

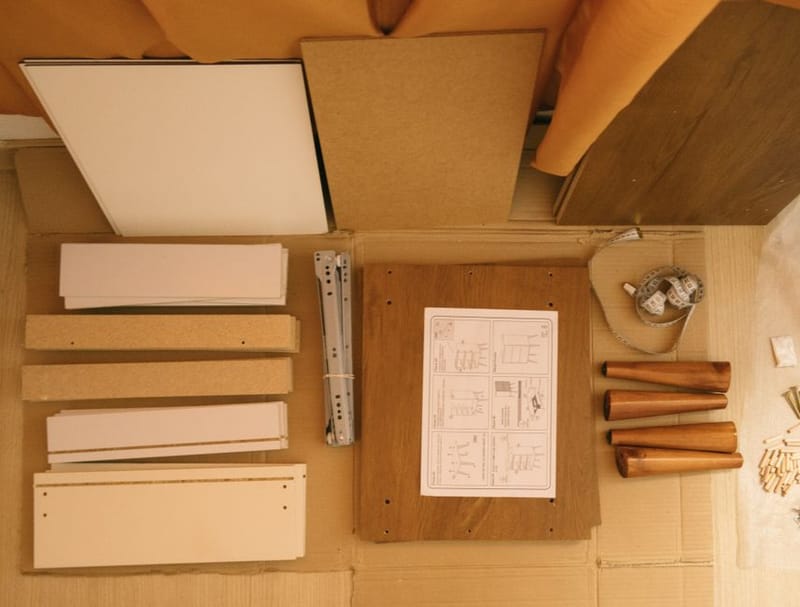
A flat-pack wardrobe is one of the few things in a rented flat that is genuinely yours, and one of the easiest to destroy on the way out. The panels are rarely the problem. The joints are: most flat-pack furniture is held together by fittings designed to be tightened once, and every rebuild costs a little of the grip that keeps the piece square.
That matters more to renters than to anyone else. Tenancies turn over faster than furniture wears out, so a bookcase bought for a first flat may be assembled and dismantled three or four times before it is finally thrown away. Building it with that future in mind, and knowing which fittings survive the process and which do not, is the difference between furniture that moves with you and a car boot full of splintered chipboard.
What tools does flat-pack actually need?
Almost every flat-pack kit ships with a stamped steel hex key, and almost every set of instructions assumes you will use nothing else. That is enough to finish the job once. It is not enough to finish it well, and it is a poor choice if you expect to take the piece apart again.
The short list below covers the whole category. None of it is specialist, and most of it earns its place the first time you build something larger than a bedside table.
A proper hand screwdriver, PZ2 and PH2
Flat-pack screws are overwhelmingly Pozidriv (PZ), not Phillips. A PH2 bit in a PZ2 screw sits proud, cams out, and chews the head. Getting this one detail right prevents most rounded screws.
A ratcheting screwdriver or a low-torque cordless driver
The volume of screws in a wardrobe makes a hand driver slow. A cordless screwdriver with a clutch, such as the Bosch IXO 7 (a compact 3.6V cordless screwdriver aimed at furniture assembly rather than drilling), does the runs and stops short of the damage a full-size drill causes.
A rubber or nylon mallet
Dowels and back panels need persuading. A steel hammer on a melamine edge leaves a permanent white crush mark; a soft-faced mallet does not.
A small square and a tape measure
Carcasses go together out of square more often than people notice, and a rack of 3mm is enough to stop drawers from closing flush.
Resealable bags and a marker
The single highest-value item on this list for a renter. Fittings that stay with their panel get reused; fittings in a loose pile get lost.
A cordless drill, only sometimes
Useful for wall restraint straps and nothing else in a typical build. Using one on cam bolts is the fastest way to ruin a panel.
Why a full-size drill is the wrong tool
A combi drill delivers far more torque than a chipboard fitting can absorb, and the trigger gives you very little control over the last half turn, which is the only part that matters. The screw reaches the bottom of its travel, the clutch does not catch in time, and the thread tears out a spiral of board. The panel looks fine from the outside. The joint is finished.
A dedicated screwdriver runs slower, has a much lower ceiling on torque, and usually offers a clutch setting low enough that it stalls before it strips. If you own one tool for flat-pack, own that one.
Which fittings are you actually tightening?
Four fittings account for nearly all flat-pack construction. Recognising them on sight tells you immediately whether a piece can be dismantled, and how carefully.
Cam locks
The dominant flat-pack joint, sometimes sold under the trade name Minifix. A cam bolt screws into the face of one panel and a round metal cam drops into a 15mm hole in the mating panel. Half a turn of the cam with a screwdriver captures the bolt head and pulls the two panels tight. Cam locks are the reason flat-pack can be dismantled at all: the joint is mechanical, not glued, and it releases cleanly when you turn the cam back.
Wooden dowels
Short beech pegs that align panels and carry shear load the cam bolt cannot. Some kits supply them dry, to be pushed in by hand. Others expect glue. This distinction decides whether the piece ever comes apart again, so it is worth checking the instructions before reaching for the wood glue.
Confirmat screws
A one-piece screw with a wide, deep, flat-cut thread and a blunt tip, made specifically for particle board. Confirmats need a stepped pilot hole and give a much stronger joint than an ordinary woodscrew, but they cut their own thread on the way in and will not re-cut a fresh one if you back them out and drive them again into the same hole.
Cross dowels and threaded inserts
A barrel nut sits in a cross-drilled hole and a machine screw threads into it. This is the only common flat-pack fitting that genuinely tolerates repeated assembly, because the thread lives in metal rather than board. Furniture built this way, typically bed frames and desks, is the safest thing in the flat to plan a move around.
Why do chipboard threads strip, and how do you stop it?
Most flat-pack carcasses are particle board: wood chips bonded with resin and pressed into a sheet, then faced with melamine or veneer. It is dimensionally stable, cheap and flat, which is exactly what a mass-produced carcass needs. What it does not have is long continuous fibre, so a screw thread holds only as well as the resin matrix around it. As the Wikipedia entry on particle board puts it, higher-density grades bring "greater resistance to failure of screw fasteners" - which is another way of saying the cheaper and lighter the board, the less abuse the joint will take.
Three habits prevent almost all stripping.
Stop at first resistance. Drive until the fitting seats, then finish the last quarter turn by hand. The joint is tight when the panels meet, not when the screwdriver refuses to move.
Keep the driver square. A cam bolt entered at an angle cuts an oval hole, and an oval hole never grips properly again. Sight down the shaft before applying any pressure.
Do not repeat-drive a Confirmat. If a Confirmat screw must come out, expect to replace it with the next size up, or to move the fixing point, rather than retighten it into the same hole.
What genuinely needs a drill in a rental?
Very little of a flat-pack build touches the wall. The exception is the one that matters most: the anti-tip restraint supplied with tall units. A wardrobe or a bookcase taller than it is deep is a tipping hazard, particularly with children in the flat, and the strap or bracket in the fittings bag is not optional packaging. It is the part that stops the piece falling forward when a drawer is opened or a shelf is climbed.
This is where renters get stuck, because the honest answer is not "find a no-drill alternative". For a loaded wardrobe there is no adhesive product that reliably substitutes for a fixing into masonry or a stud. The workable answer is to drill, and to make good properly when you leave. Two small filled holes behind a wardrobe are a normal, expected part of living in a property. Under the government's tenancy deposit protection rules a deposit is returned provided you have met the tenancy terms and have not damaged the property, and filled fixing holes are ordinarily treated as making good rather than damage. Ask the landlord or agent in writing first, keep the reply, and fill and touch in before the check-out inspection.
For everything else in the flat that would otherwise want a wall fixing, the no-drill route is usually the better one. Our guide to securing a rented flat without drilling covers the devices that mount on adhesive or tension rather than screws.
If you are fixing more than one bracket, getting the line right first saves re-drilling. A cross-line tool such as the Huepar BOX-1G (a self-levelling green cross-line laser) projects a level reference across the wall so the second hole is right the first time, which is the whole point when every hole is one you will have to fill later.
How do you dismantle flat-pack without wrecking it?
Dismantling is where most furniture is lost, and almost always for the same reason: it is done last, at speed, on moving day, by someone who no longer cares. Doing it a week early and slowly is the single biggest determinant of whether the piece survives.
Photograph it before you touch anything
Take shots of each face and each joint, plus a close-up of any fitting you do not recognise. Instructions get lost; photographs of your own build do not, and they resolve the orientation questions that stall a rebuild.
Empty it, then remove doors and drawers
Drawers slide out, doors come off at the hinge plate. Keep hinges attached to the door where possible and put the plate screws in a bag taped to that door. A carcass without doors is far lighter and much less likely to rack.
Take the back panel off first
The thin hardboard back is pinned or screwed on last during assembly, so it comes off first. Prise pins rather than pulling the board, which tears. If it splits, note the dimensions now: a replacement sheet is inexpensive and can be cut before the move.
Release the cam locks, then the dowels
Turn each cam back a half turn and check the panel moves before applying force anywhere. If a joint still holds after every cam is released, it is glued and should be left assembled rather than forced.
Leave cam bolts in the panels they came from
Unscrewing a cam bolt achieves nothing and consumes one more cycle of thread grip. Leave it seated, and the joint reassembles at close to original strength.
Bag and label per panel, not per type
One bag reading "wardrobe, left side" beats one reading "cam bolts". Tape each bag to its own panel so nothing depends on a box arriving.
Protect the edges in transit
Melamine chips at the corners and every chip is permanent. Cardboard offcuts taped over the corners, and panels carried face to face rather than stacked with fittings between them, prevent nearly all of it.
Which pieces are worth moving, and which are not?
Not everything deserves the van space. The realistic test is whether the joints are mechanical, how long the unsupported panels are, and what a replacement actually costs.
Usually worth moving: bed frames and desks built on cross dowels, small drawer units, bedside tables, and any bookcase with a solid back rather than a pinned hardboard sheet. These come apart cleanly and go back together square.
Often not worth moving: full-height wardrobes with long thin side panels, which flex and crack at the cam holes; anything already rebuilt two or three times; and glued-dowel pieces, which will not release at all. A wardrobe that has to be levered apart arrives as a pile of panels with oval holes, and the replacement cost is frequently less than the cost of the damage plus the labour.
Worth a decision in advance: anything with a mirror or a glass shelf. These travel badly, and they are the components most likely to turn a scuffed move into a deposit dispute over damage to the property itself.
Where should the furniture go once it is built?
Placement is the part of flat-pack that renters most often get wrong, and it costs more than a stripped cam. A tall wardrobe pushed flat against a cold external wall blocks air movement across the coldest surface in the room. Warm, moist air still reaches the wall through the gaps, condenses on it, and cannot dry out. The result is mould on the back of the wardrobe and on the wall behind it, discovered at check-out.
Leave a gap of several centimetres between the carcass and any external wall, keep the piece off the wall entirely if the room already runs damp, and prefer an internal wall for anything full height. Our guide to stopping damp and condensation in a rented flat goes through the ventilation side of the same problem.
The other placement rule is simply floor flatness. Rental floors are rarely level, and a carcass that sits on three of its four feet will rack, jam its drawers, and eventually crack at a cam hole. Check with a level once the piece is upright and pack the low corner before you load it, not after the doors stop closing.
Frequently asked questions
Can flat-pack furniture be reassembled after a move?
Do I need my landlord's permission to strap a wardrobe to the wall?
What do I do if a cam bolt hole has stripped?
Is a cordless screwdriver worth buying just for flat-pack?
Should I glue flat-pack joints for extra strength?
Why do flat-pack screws keep rounding off?
How to Secure a Rented Flat Without Drilling

How to Stop Damp and Condensation in a Rented Flat